This broiled chicken recipe is the one I reach for when I want something fast, simple, and full of flavor without firing up an outdoor grill. Sliced chicken breast cooks directly under the broiler, picking up real char on the edges while staying juicy in the center. A short list of pantry seasonings and a heating element doing most of the work is all this recipe asks of you.

I made this the first time on a night when I couldn’t be bothered to clean a grill pan or stand over the stove. The broiler gave me the same kind of color and texture I usually associate with outdoor cooking, just from inside my own oven. It’s stayed on my list ever since, especially on nights when dinner needs to happen quickly.

Why Slicing the Chicken Thinner Changes Everything
Slicing each chicken breast open lengthwise before it goes under the broiler means both halves cook through faster and more evenly than one thick piece would. This matters a great deal under a broiler, where all the heat comes from a single direction above the food rather than surrounding it. The same even-thickness logic is exactly why the slow cooker shredded chicken and the ground chicken recipes both focus on consistent piece size before cooking begins.
Why the Seasoning Goes Directly on the Oiled Surface
Rubbing the garlic, salt, pepper, and cayenne onto the chicken after brushing it with olive oil gives the seasoning something to cling to, rather than letting it fall off as soon as it hits heat. This pressed-in method builds a light, flavorful crust as the chicken cooks rather than leaving loose seasoning sitting on top.
Why Flipping Twice Matters Under a Broiler
A broiler cooks from one direction only, so flipping the chicken partway through and then again near the end ensures both sides get equal exposure to the heating element, rather than one side charring while the other stays pale. This is a very different approach from frying, where heat surrounds the food from below and the sides at the same time.

How To Make Broiled Chicken Breast Recipe
This broiled chicken recipe uses sliced chicken breast brushed with olive oil and rubbed with a garlic and spice blend, cooked directly under the broiler until charred on the edges and juicy inside. Ready in under 30 minutes with one baking sheet.
Kitchen Gadgets:
- Baking Sheet: Holds the chicken under the broiler and needs to be sturdy enough to handle high, direct heat.
- Foil or Parchment Paper: Lines the baking sheet for easy cleanup and prevents the chicken from sticking to the surface.
- Small Bowl: Combines the garlic, salt, pepper, and cayenne into an even seasoning blend before it touches the chicken.
- Pastry Brush: Brushes the olive oil evenly across both sides of the chicken before seasoning.
- Tongs: Flips the chicken safely under the broiler without piercing the surface.
- Meat Thermometer: Confirms the chicken has reached a safe internal temperature rather than relying on time alone.
Ingredients:
- Chicken Breasts: Three large breasts, sliced open lengthwise into thinner, even pieces. Boneless, skinless chicken breast is the right cut for this method.
- Olive Oil: Brushed onto both sides before seasoning. Helps the spice rub stick and keeps the surface from drying out under the broiler’s direct heat.
- Garlic: Minced garlic mixed directly into the seasoning rub. Fresh garlic gives a sharper flavor, though jarred minced garlic works fine.
- Salt: The base seasoning that brings out the chicken’s natural flavor.
- Black Pepper: Adds a mild background heat to the spice blend.
- Cayenne: A small amount for a subtle kick. Increase slightly if you prefer more heat.
- Fresh Parsley and Dill: Garnish added after cooking. Brightens the finished dish without changing the seasoning underneath.
*Exact measurements are listed in the recipe card below.
FULL INSTRUCTIONS WITH STEPS FOR BROILED CHICKEN RECIPE
First Step: Preheat and Prepare the Tray
Set your oven to broil and prepare a baking sheet by lining it with foil or parchment. Lightly grease the surface so the chicken doesn’t stick when it goes under the heat. Make sure the oven rack is positioned close to the broiler element before continuing.

Second Step: Slice and Coat the Chicken
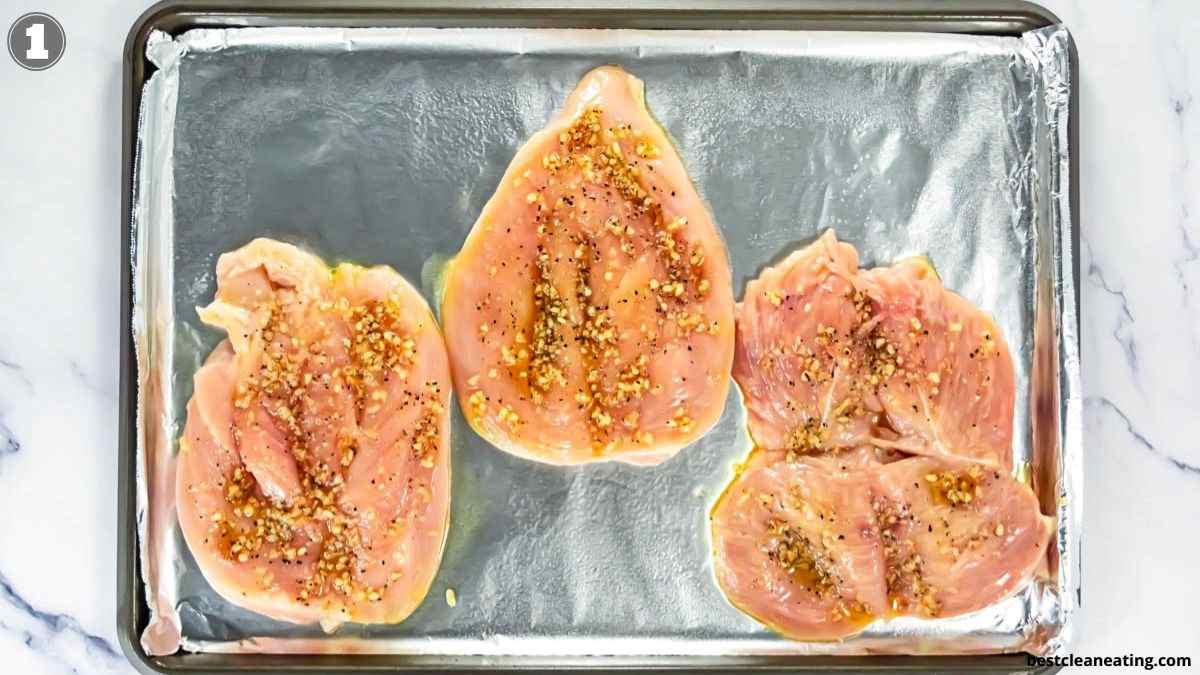
Pat the chicken breasts dry and slice them open lengthwise to create thinner, even pieces. Brush each piece with olive oil on both sides to fully coat the surface. This step ensures the seasoning that follows has something to adhere to as the chicken cooks.

Third Step: Season the Chicken
In a bowl, combine the garlic, salt, black pepper, and cayenne. Rub this mixture evenly over the chicken, pressing it gently so it makes full contact with the oiled surface. Coat each piece on both sides before placing it on the tray.

Fourth Step: Broil Until Charred and Cooked Through
Place the chicken on the prepared tray and broil for about 10 minutes. Carefully remove the tray, flip the chicken, and return it to the oven for another 10 minutes; then flip once more and cook for an additional 5 minutes. Check that the chicken is fully cooked, continuing in short intervals if needed, then let it rest briefly before serving with fresh herbs if desired.
Zuzana’s Kitchen Notes:
The first time I made this, I left the oven rack in its usual middle position, as I would for regular baking, and the chicken cooked through but barely browned. Moving the rack up so the tray sits closer to the heating element is what actually gives broiled chicken its char, since the broiler only works properly when the food is close enough to catch direct, intense heat. Once I adjusted the rack position, the edges developed real color within the first 10 minutes, and the inside stayed juicy the whole way through. For another recipe where heat placement changes the entire outcome, my cheesy crack chicken casserole covers a similar lesson, just with a completely different cooking method.
- A meat thermometer removes all the guesswork. The chicken should reach 165°Fahrenheit at the thickest point before you pull it, regardless of how many minutes have passed on the clock.
- If your broiler runs unevenly, rotate the tray partway through cooking so one side doesn’t char faster than the other.
- A squeeze of fresh lemon juice over the finished chicken brightens the flavor without changing anything in the seasoning blend.
- Marinating the chicken briefly in olive oil and a little lemon juice before broiling adds extra depth if you have the time, though the recipe works well without it.

FREQUENTLY ASKED QUESTIONS
What to Serve With Juicy Broiled Chicken?
This broiled chicken pairs well with something that can soak up its juices on the plate. Master cooking rice guide gives you a reliable side that works under almost any protein, and the broccoli and cauli bake adds a filling vegetable side that rounds out the meal without much extra effort.
Let the chicken cool completely, then store it in an airtight container in the fridge for up to 3 days. Reheat gently in a pan over low heat or in the microwave with a small splash of water to keep it from drying out.

Can I Freeze Cooked Chicken?
This broiled chicken freezes well once fully cooled. Wrap pieces tightly in plastic wrap or place them in a freezer-safe bag with the air pressed out, and they keep for up to 2 months. Thaw overnight in the fridge and reheat gently in a skillet over low heat.
More Clean Eating Recipes
Here are a few more clean eating recipes worth trying next. The gluten-free wraps work well with leftover sliced broiled chicken for a quick lunch the next day. Try the curry chicken when you want a completely different flavor direction using a similar protein. Finish the week with the no-bake protein cheesecake for something sweet that comes with very little effort.
Pin For Later

Need Support or have Questions? Join our Free Facebook Group.
Follow us on Pinterest, Facebook, Instagram, TikTok, Flipboard, or YouTube.
For weekly New Recipes and a FREE E-Book get into our NEWSLETTER.
Full Recipe With a Printable Version
I would be grateful if you could give us a 5-star rating.

Broiled Chicken
Equipment
Ingredients
- 3 Large Chicken Breasts
- 2 Tablespoons Olive Oil
- 3 teaspoons Garlic minced
- 1 teaspoon Salt
- ½ teaspoon Black Pepper
- ¼ teaspoon Cayenne
- Fresh Parsley for garnish
- Dill for garnish
Instructions
- Set the oven to broil, line the tray, grease the surface, and position the rack close to the heat.
- Pat the chicken dry, slice lengthwise, and coat both sides with olive oil.
- Mix the garlic, salt, pepper, and cayenne, then rub evenly over the chicken.
- Broil for 10 minutes, flip, cook another 10 minutes, then flip again and finish for 5 minutes before resting and serving.
Notes
- A meat thermometer removes all the guesswork. The chicken should reach 165°Fahrenheit at the thickest point before you pull it, regardless of how many minutes have passed on the clock.
- If your broiler runs unevenly, rotate the tray partway through cooking so one side doesn’t char faster than the other.
- A squeeze of fresh lemon juice over the finished chicken brightens the flavor without changing anything in the seasoning blend.
- Marinating the chicken briefly in olive oil and a little lemon juice before broiling adds extra depth if you have the time, though the recipe works well without it.
Nutrition
Disclaimer
Please note that nutrient values are estimates only. Variations can occur due to product availability and manner of food preparation. Nutrition may vary based on methods of origin, preparation, freshness of ingredients, and other factors.
Cauliflower Recipes as sides
Cauliflower dishes pair well with broiled chicken because they add a simple vegetable side with plenty of texture and flavor. Try roasted, mashed, cheesy, seasoned, or sautéed cauliflower dishes to round out the meal and add some variety.