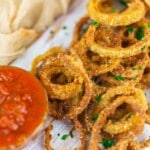
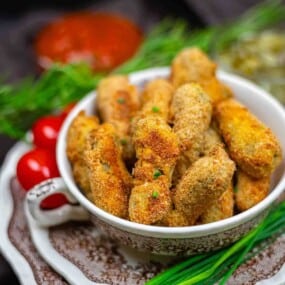
Looking for a delicious way to turn dill pickles into a crunchy, irresistible treat? These Fried Dill Pickles are the perfect snack. Crispy fried pickles are a perfect, easy appetizer; they’re great for parties or a quick treat.

Being a busy mom, I needed a snack that was fast but still special enough to feel like a treat. I spotted a jar of dill pickles tucked away in the fridge and decided to dip them in a crispy coating and fry them up. It has become our little family favorite when we want something fun and easy between meals.

Air Fryer, Deep Fried, or Oven Baked
You can cook fried pickles in an air fryer for a lighter option, deep fry them for extra crispiness, or bake them for a hands-off method. Each method works, but deep frying gives you the crispiest results. The air fryer is a great middle ground with less oil and still plenty of crunch.
Is this an Appetizer
Yes, just like feta cheese egg and popcorn chicken, fried pickles are a popular appetizer, especially in diners and BBQ spots. They’re perfect to kick off a meal or enjoy with drinks. Serve with a dip, and they disappear fast.
How To Make Fried Pickles
Crispy, tangy, and totally addictive, fried pickles are the ultimate snack or party appetizer. With just a few pantry staples, you can whip up a batch that’s golden and delicious every time.

Kitchen Gadgets:
- Bowls: Great for organizing your dredging station.
- Parchment Paper: Prevents sticking and makes for super easy cleanup after baking.
- Baking Tray: Holds the pickles while they crisp up evenly in the oven.
- Oven: Bakes your pickles to crispy perfection without the mess of deep-frying.
Ingredients:
- Egg: Acts as the glue that helps the breading stick to each pickle.
- Coconut Flour: An alternative that gives a light coating with a hint of natural sweetness.
- Breading: Adds that golden, crunchy texture we all love in fried snacks.
- Mini Pickles, Whole: The tangy, juicy centerpiece that gets transformed into a crispy bite.
*Exact measurements are listed in the recipe card below.
FULL INSTRUCTIONS WITH STEPS FOR FRIED DILL PICKLES RECIPE
First Step: Prep Your Clean Ingredients
Gather all the necessary ingredients, such as pickle slices, coconut flour, eggs, seasonings, and a clean breading of your choice. Ensure the pickles are well-drained to prevent sogginess during baking. Preheat your oven to 200°Celsius (400°Fahrenheit) so it’s hot and ready.

Second Step: Light Coconut Flour Coating
Dip each pickle into coconut flour and gently shake off the excess. This light coating helps the wet mixture stick better and keeps the pickles crispy. It also adds a nice, clean-eating twist with a grain-free option.

Third Step: Dip in Egg Wash
Crack your eggs into a bowl and whisk until smooth. Coat each floured pickle in the egg wash, making sure it’s fully covered. This step binds the breading to the pickles for that crispy, baked crunch.

Fourth Step: Clean Breading Layer
Roll each egg-coated pickle in your clean breading mix; almond flour or crushed grain-free crackers work great here. Press gently so the coating sticks well on all sides. Set each one on a parchment-lined baking sheet.

Fifth Step: Bake Until Crispy
Place the baking sheet in your preheated oven and bake at 200°Celsius (400°Fahrenheit) for 10 minutes. Flip the pickles and bake for another 5 minutes until both sides are golden and crispy. Serve warm with your favorite clean dipping sauce, perfect for a guilt-free snack.

TRICKS AND TIPS:
- Pat the pickles dry before coating. Moisture is the enemy of crispiness. Blotting your pickles with a paper towel before breading helps the coating stick better and keeps the final bite crunchy instead of soggy.
- Double-dip for extra crunch. If you like a thick, crispy shell, dip the pickles in egg and coat twice in breadcrumbs. The extra layer adds more texture and holds up well whether you’re frying or using an air fryer.
- Don’t overcrowd the oven. When pickles are packed too close, the heat can’t circulate properly, which leads to uneven cooking and soggy spots. Give them space, and fry in small batches for the crispiest results.

FREQUENTLY ASKED QUESTIONS
What to Serve With Fried Pickles Recipe?
Fried pickles go great with creamy dips like ranch dressing, spicy mayo, or even a simple garlic yogurt sauce. They’re a fun side for orange chicken, green bean casserole, or tomato and veggie salad. You can also serve them as a crunchy snack at parties or game nights together with chicken poppers with zucchini and stuffed zucchini boats.
How Do I Store Fried Dill?
Let the fried dill pickles cool completely before storing. Place them in an airtight container lined with paper towels to absorb extra moisture. Store in the fridge and eat within 2 to 3 days for the best texture.

Tips for Crispy Fried Pickles Leftover
Reheat leftovers in an air fryer or oven to bring back the crisp, never in the microwave. Spread them out so they don’t steam, and avoid stacking. A quick reheat at 375°Fahrenheit (190°Celsius) for 5–7 minutes usually does the trick.
Yes, but the texture may change a little. Freeze them on a tray first, then transfer to a sealed container or freezer bag. Reheat in an oven or air fryer to bring back some of the crunch.
More Clean Eating Recipes
Discover more clean-eating recipes that bring fresh flavors and wholesome ingredients to your table. Try the vibrant hibiscus flower powder for a natural, tangy twist in drinks and desserts. Almond horn cookies make a perfect light treat that’s both crunchy and satisfying.
The homemade sausage recipe is simple and full of rich, clean flavors you can trust. These recipes are great for anyone who wants tasty food without the extra additives.
Pin For Later

Need Support or have Questions? Join our Free Facebook Group.
Follow us on Pinterest, Facebook, Instagram, TikTok, Flipboard, or YouTube.
For weekly New Recipes and a FREE E-Book get into our NEWSLETTER.
Full Recipe With a Printable Version
I would be grateful if you could give us a 5-star rating.
Fried Dill Pickles
Equipment
Ingredients
- 1 Piece Egg
- 1/2 Cup Coconut Flour
- 1 Cup Breading
- 15 Pieces Mini Pickles Whole
Video
Instructions
- Gather all the necessary ingredients, such as pickle slices, coconut flour, eggs, seasonings, and a clean breading of your choice. Ensure the pickles are well-drained to prevent sogginess during baking. Preheat your oven to 200°Celsius (400°Fahrenheit) so it’s hot and ready.
- Dip each pickle into coconut flour and gently shake off the excess. This light coating helps the wet mixture stick better and keeps the pickles crispy. It also adds a nice, clean-eating twist with a grain-free option.
- Crack your eggs into a bowl and whisk until smooth. Coat each floured pickle in the egg wash, making sure it’s fully covered. This step binds the breading to the pickles for that crispy, baked crunch.
- Roll each egg-coated pickle in your clean breading mix; almond flour or crushed grain-free crackers work great here. Press gently so the coating sticks well on all sides. Set each one on a parchment-lined baking sheet.
- Place the baking sheet in your preheated oven and bake at 200°Celsius (400°Fahrenheit) for 10 minutes. Flip the pickles and bake for another 5 minutes until both sides are golden and crispy. Serve warm with your favorite clean dipping sauce, perfect for a guilt-free snack.
Notes
- Pat the pickles dry before coating. Moisture is the enemy of crispiness. Blotting your pickles with a paper towel before breading helps the coating stick better and keeps the final bite crunchy instead of soggy.
- Double-dip for extra crunch. If you like a thick, crispy shell, dip the pickles in egg and coat twice in breadcrumbs. The extra layer adds more texture and holds up well whether you’re frying or using an air fryer.
- Don’t overcrowd the oven. When pickles are packed too close, the heat can’t circulate properly, which leads to uneven cooking and soggy spots. Give them space, and fry in small batches for the crispiest results.
Nutrition
Disclaimer
Please note that nutrient values are estimates only. Variations can occur due to product availability and manner of food preparation. Nutrition may vary based on methods of origin, preparation, freshness of ingredients, and other factors.
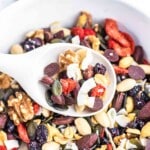
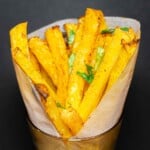
more snack ideas
Need more snack ideas? Try these easy, tasty options, from crunchy bites to savory treats, that are perfect for curbing cravings anytime.